Are you facing the slow-loading WordPress site? There are many reasons that can result in this. Among them, outdated cache files could be the main reason. So, it is important to learn how to clear the WordPress cache because this not only helps to improve your website performance but also ensures your website visitors get to experience the latest content updates.
Caching is crucial, as it saves the temporary versions of your website’s pages that include files, images, and database queries. This helps reduce the load on the server and promotes fast loading times. Caching is helpful, but if they are outdated, they tend to render old content and also slow down your website performance. Therefore, we are here with an easy guide that can help with learning everything about clearing your website cache.
Iron Security
Protect your WordPress website from any threat
Are you facing the slow-loading WordPress site? There are many reasons that can result in this. Among them, outdated cache files could be the main reason. So, it is important to learn how to clear the WordPress cache because this not only helps to improve your website performance but also ensures your website visitors get to experience the latest content updates.
Caching is crucial, as it saves the temporary versions of your website’s pages that include files, images, and database queries. This helps reduce the load on the server and promotes fast loading times. Caching is helpful, but if they are outdated, they tend to render old content and also slow down your website performance. Therefore, we are here with an easy guide that can help with learning everything about clearing your website cache.
Understanding WordPress Cache and Why It Matters
WordPress cache is a virtual temporary storage space system that saves copies of your website data; these saved data enable faster loading of the website pages for the visitors. Here is a practical situation: when a user visits your website, it renders the cached version of the website from storage rather than fully loading the entire page from scratch using the multiple database queries. This makes the servers efficient and prevents additional load.
Data is often cached at several different levels. Here are the simple breakdown of these levels:
- The page cache is a type of cache that stores and saves the entire HTML page.
- Another type is browser cache; this stores the cached CSS files, Javascript files, and also cached images on the visitor’s devices.
- Next, the database cache stores the database query results.
- If a website needs to store the compiled PHP code, it uses Opcode cache.
- When a user frequently accesses certain data, it uses Object Cache.
- CDN cache, or Content Delivery Network Cache works to distribute the cached content all across your global servers.
Yes, caching is essential to improve your website performance and enables your site to load faster. If you are still using outdated cached files, these can seriously cause your website to load drastically slower even after updating plugins and themes.
When You Should Clear Cache in WordPress
We don’t recommend you clear the cache constantly; however, there are certain situations that strictly require you to clear the cache. Here are some situations in which you must clear your cache:
- When making design changes to your WordPress theme or any code files.
- If you are installing or updating plugins, it’s mandatory to clear your website cache.
- At the time you are installing or updating plugins, it becomes mandatory to clear your website cache.
- Migrating your website to a new hosting provider or a new domain.
- When you find any buds or broken layouts, after resolving broken layouts, you should clear the cache.
- If you are testing new features, removing the old and outdated cache is essential.
Why You Should Clear Cache Regularly in WordPress
If you own a WordPress website, a slow website speed and performance can cost you the user experience. Yes, the speed of your website depends on the design and the quality of the content, but it also includes the proper management of your own caching.
This small thing can help your site load faster, and with that, prevent all the caching-related issues. Therefore, we always suggest you clear your cache using your WordPress admin area because the admin area in WordPress is so powerful and easy to adapt.
What Is a Cache Break and Why It Matters

A cache break in WordPress happens in a situation when the stored cache or cached version of the site is intentionally refreshed. This process is essential because it helps in loading the new content to your users after you have cleared the outdated cache files.
When to Perform a Cache Break
Here are some situations in which you must consider performing a cache break:
- After you have made important design and layout changes.
- When a user has updated or activated plugins and themes.
- In the situation, you are performing the website migration.
- If you are performing any troubleshooting of functionality issues.
How to Clear Browser Cache in WordPress
In most of the scenarios, browser cache is the simplest cache to clear. Browser cache stores site data on your visitors’ websites. It’s impossible to clear your visitors’ cache; you can teach them how to do it and also clear your own browser cache for testing purposes.
How to Clear your Cache in Google Chrome
Google Chrome is a widely used browser; here is how you can clear your browser cache:
- Firstly, click on the three-dot menu from the top-right corner.
- Now, select “Settings.”
- Navigate to “Privacy and security.”
- From here click on “Clear browsing data.”
- After this, select “Cached images and files” along with any other site data you want to remove.
- Finally, choose your time range, and click “Clear data.”
If you want faster access to this setting, you can simply press Ctrl+Shift+Delete (Windows) or Cmd+Shift+Delete (Mac) to open the clearing dialog directly.
Clearing Your Own Browser Cache in Other Browsers
If you are using some different browser than that of Google Chrome, here are some easy steps you need to follow:
For Firefox Users:
Go to Settings » Privacy & Security » Cookies and site data.
For Safari Users:
Visit Preferences » Privacy » Manage Website Data.
For Microsoft Edge Users:
You can follow a similar path to the Chrome browser and find settings under Settings » Privacy, search, and services.
If you are tired of following these steps every time and want to clear the cache regularly, you can clear your entire browser cache during the development of any application; you can use browser extensions. to simplify and automate the entire process.
How to Clear Cache Using a Caching Plugin
For the users who want to manage their site’s cache, you can use a WordPress caching plugin. These plugins simplify the process and make the process easier. Now, we should explore the popular WordPress caching plugins and how to use them.
Using WP Super Cache to Clear Cache Manually
Most caching plugins in the market lack essential features, but WP Super Cache is one of the trusted plugins. Here are easy steps you should follow:
- Install and activate the plugin; you can find “WP Super Cache” in the WordPress Plugins section.
- Now, from your WordPress dashboard, navigate to Settings » WP Super Cache.
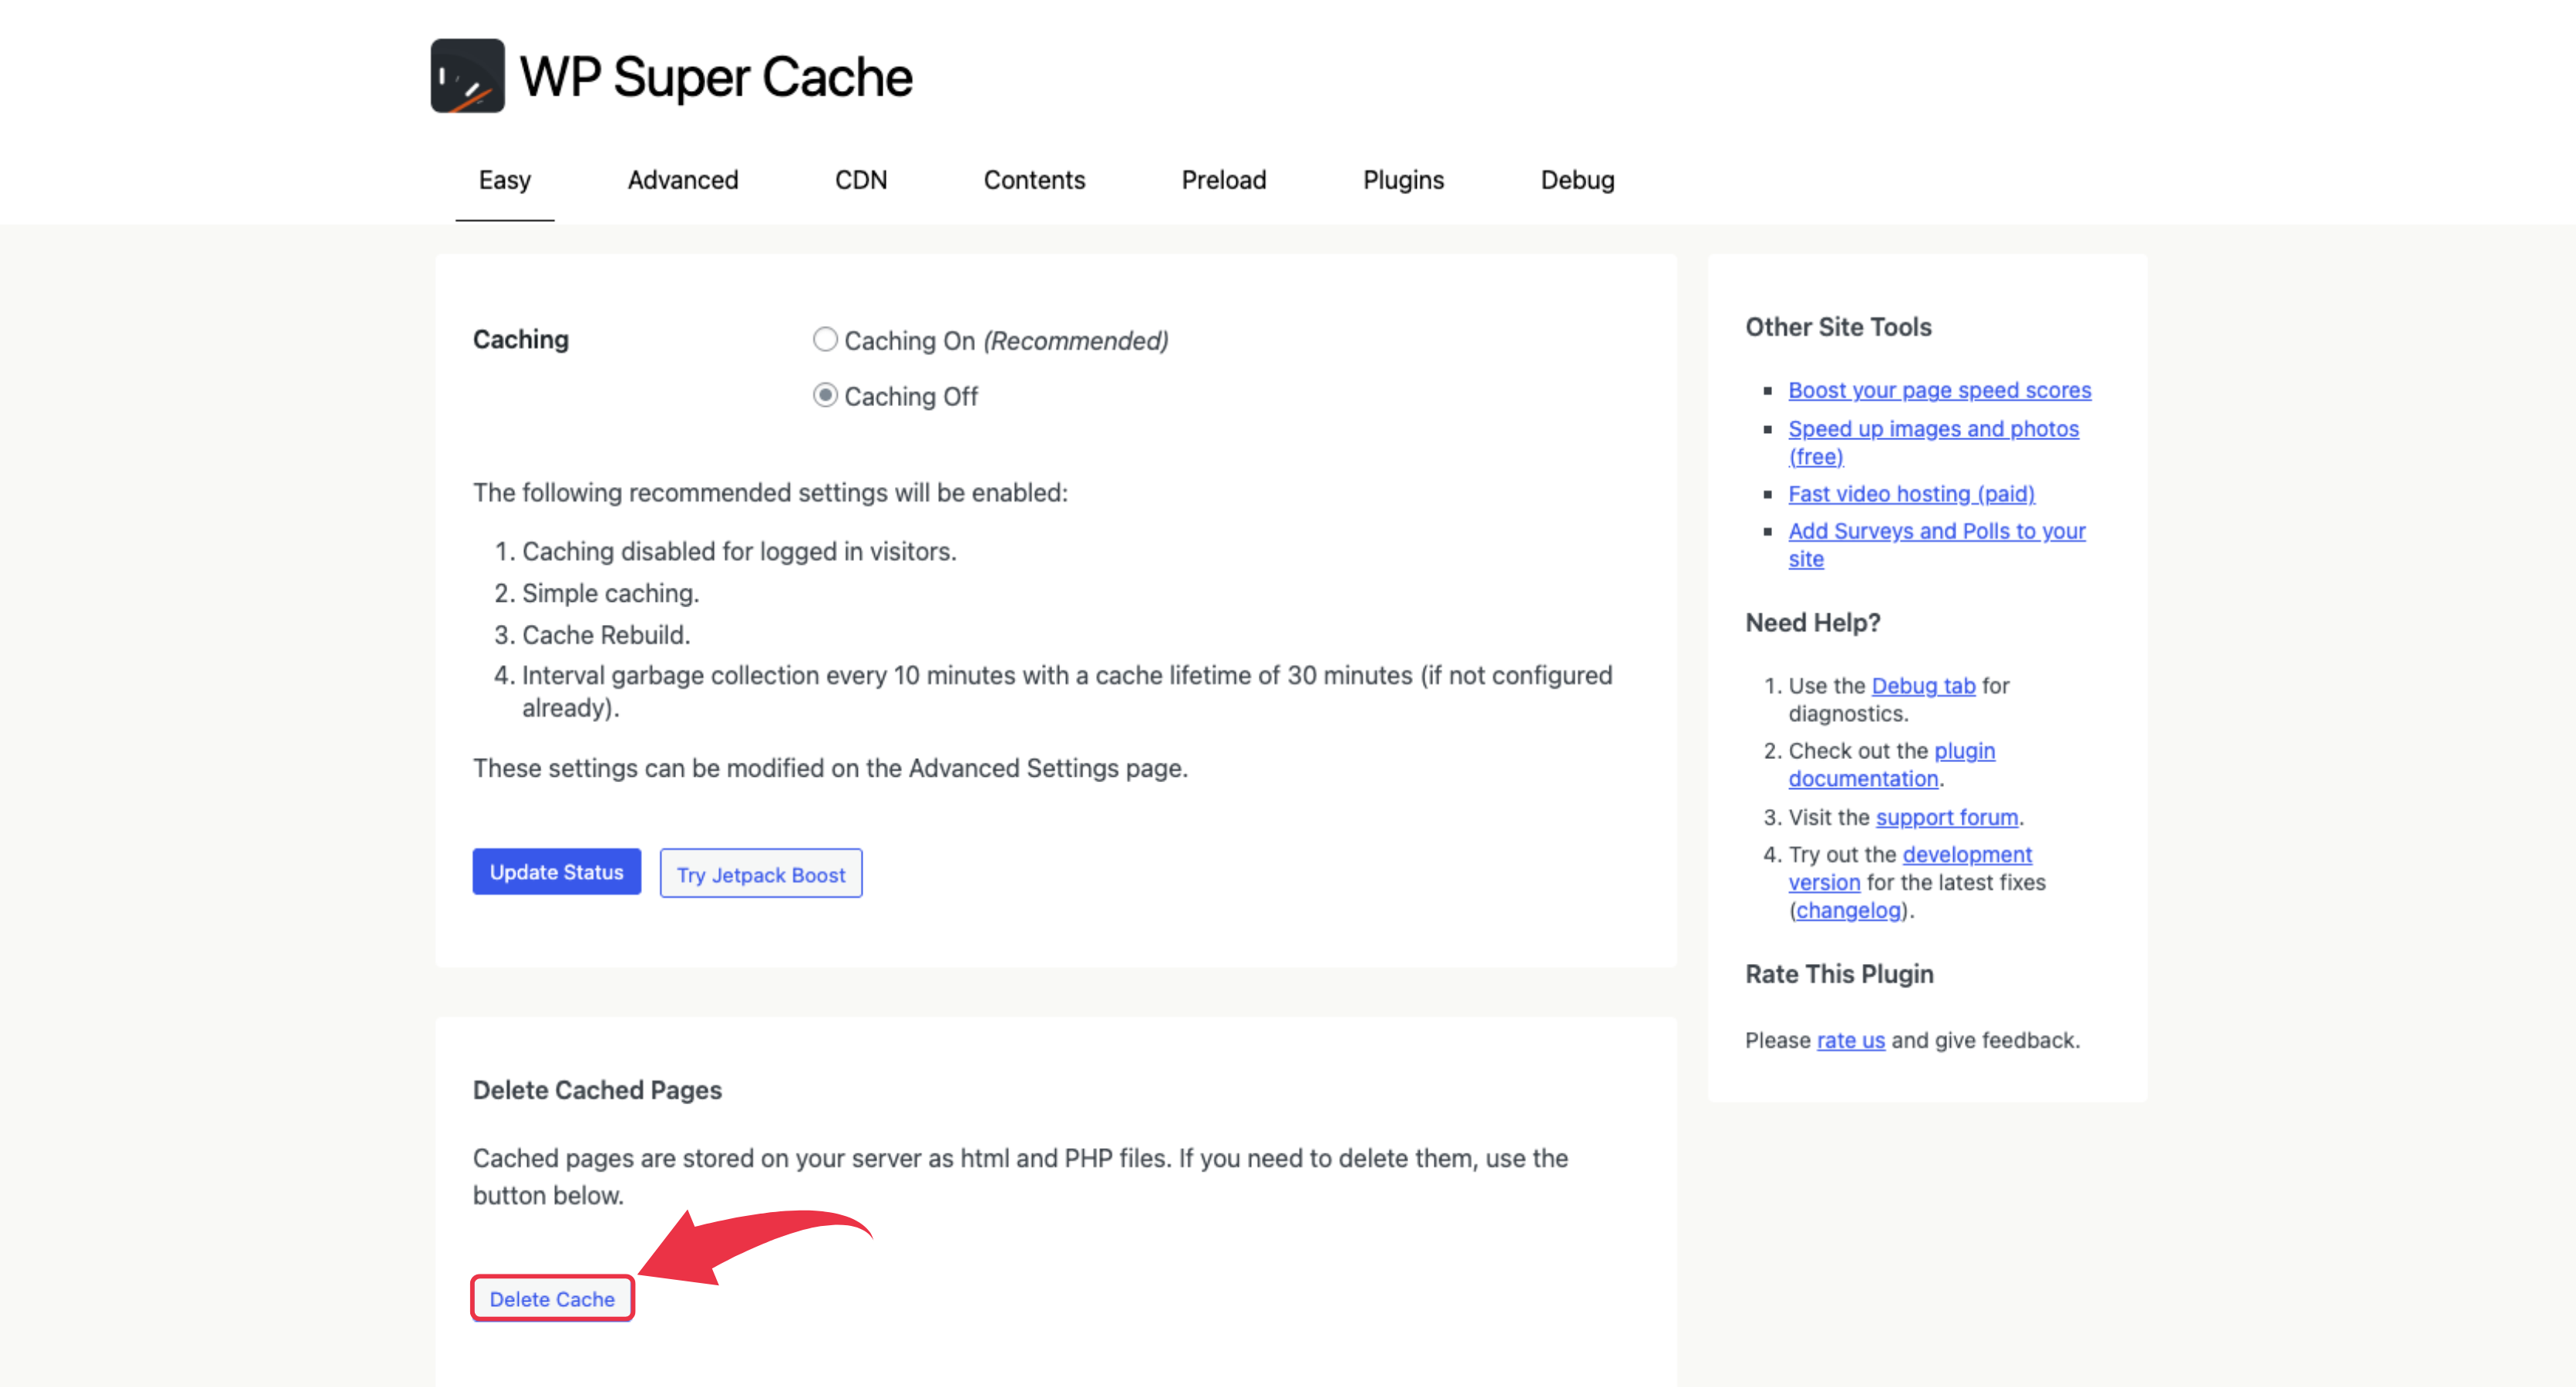
- After this, using your WordPress admin dashboard, click the “Delete Cache” button to remove all cached files.
For even more control, you can use the Delete Cache tab. The plugin lets you clear only expired files or delete the cache for certain pages.
The wp cache flush command in WP Super Cache lets developers clear the cache from the command line.
Clearing Cache with W3 Total Cache
If you find it harder to use the last plugin, W3 Total Cache is another popular caching plugin that has awesome caching features that include page cache, database cache, object cache, and browser cache management.
You can access this plugin using these easy steps:
- Install and activate the plugin by searching “W3 Total Cache” in the WordPress Plugin Market from your website dashboard.
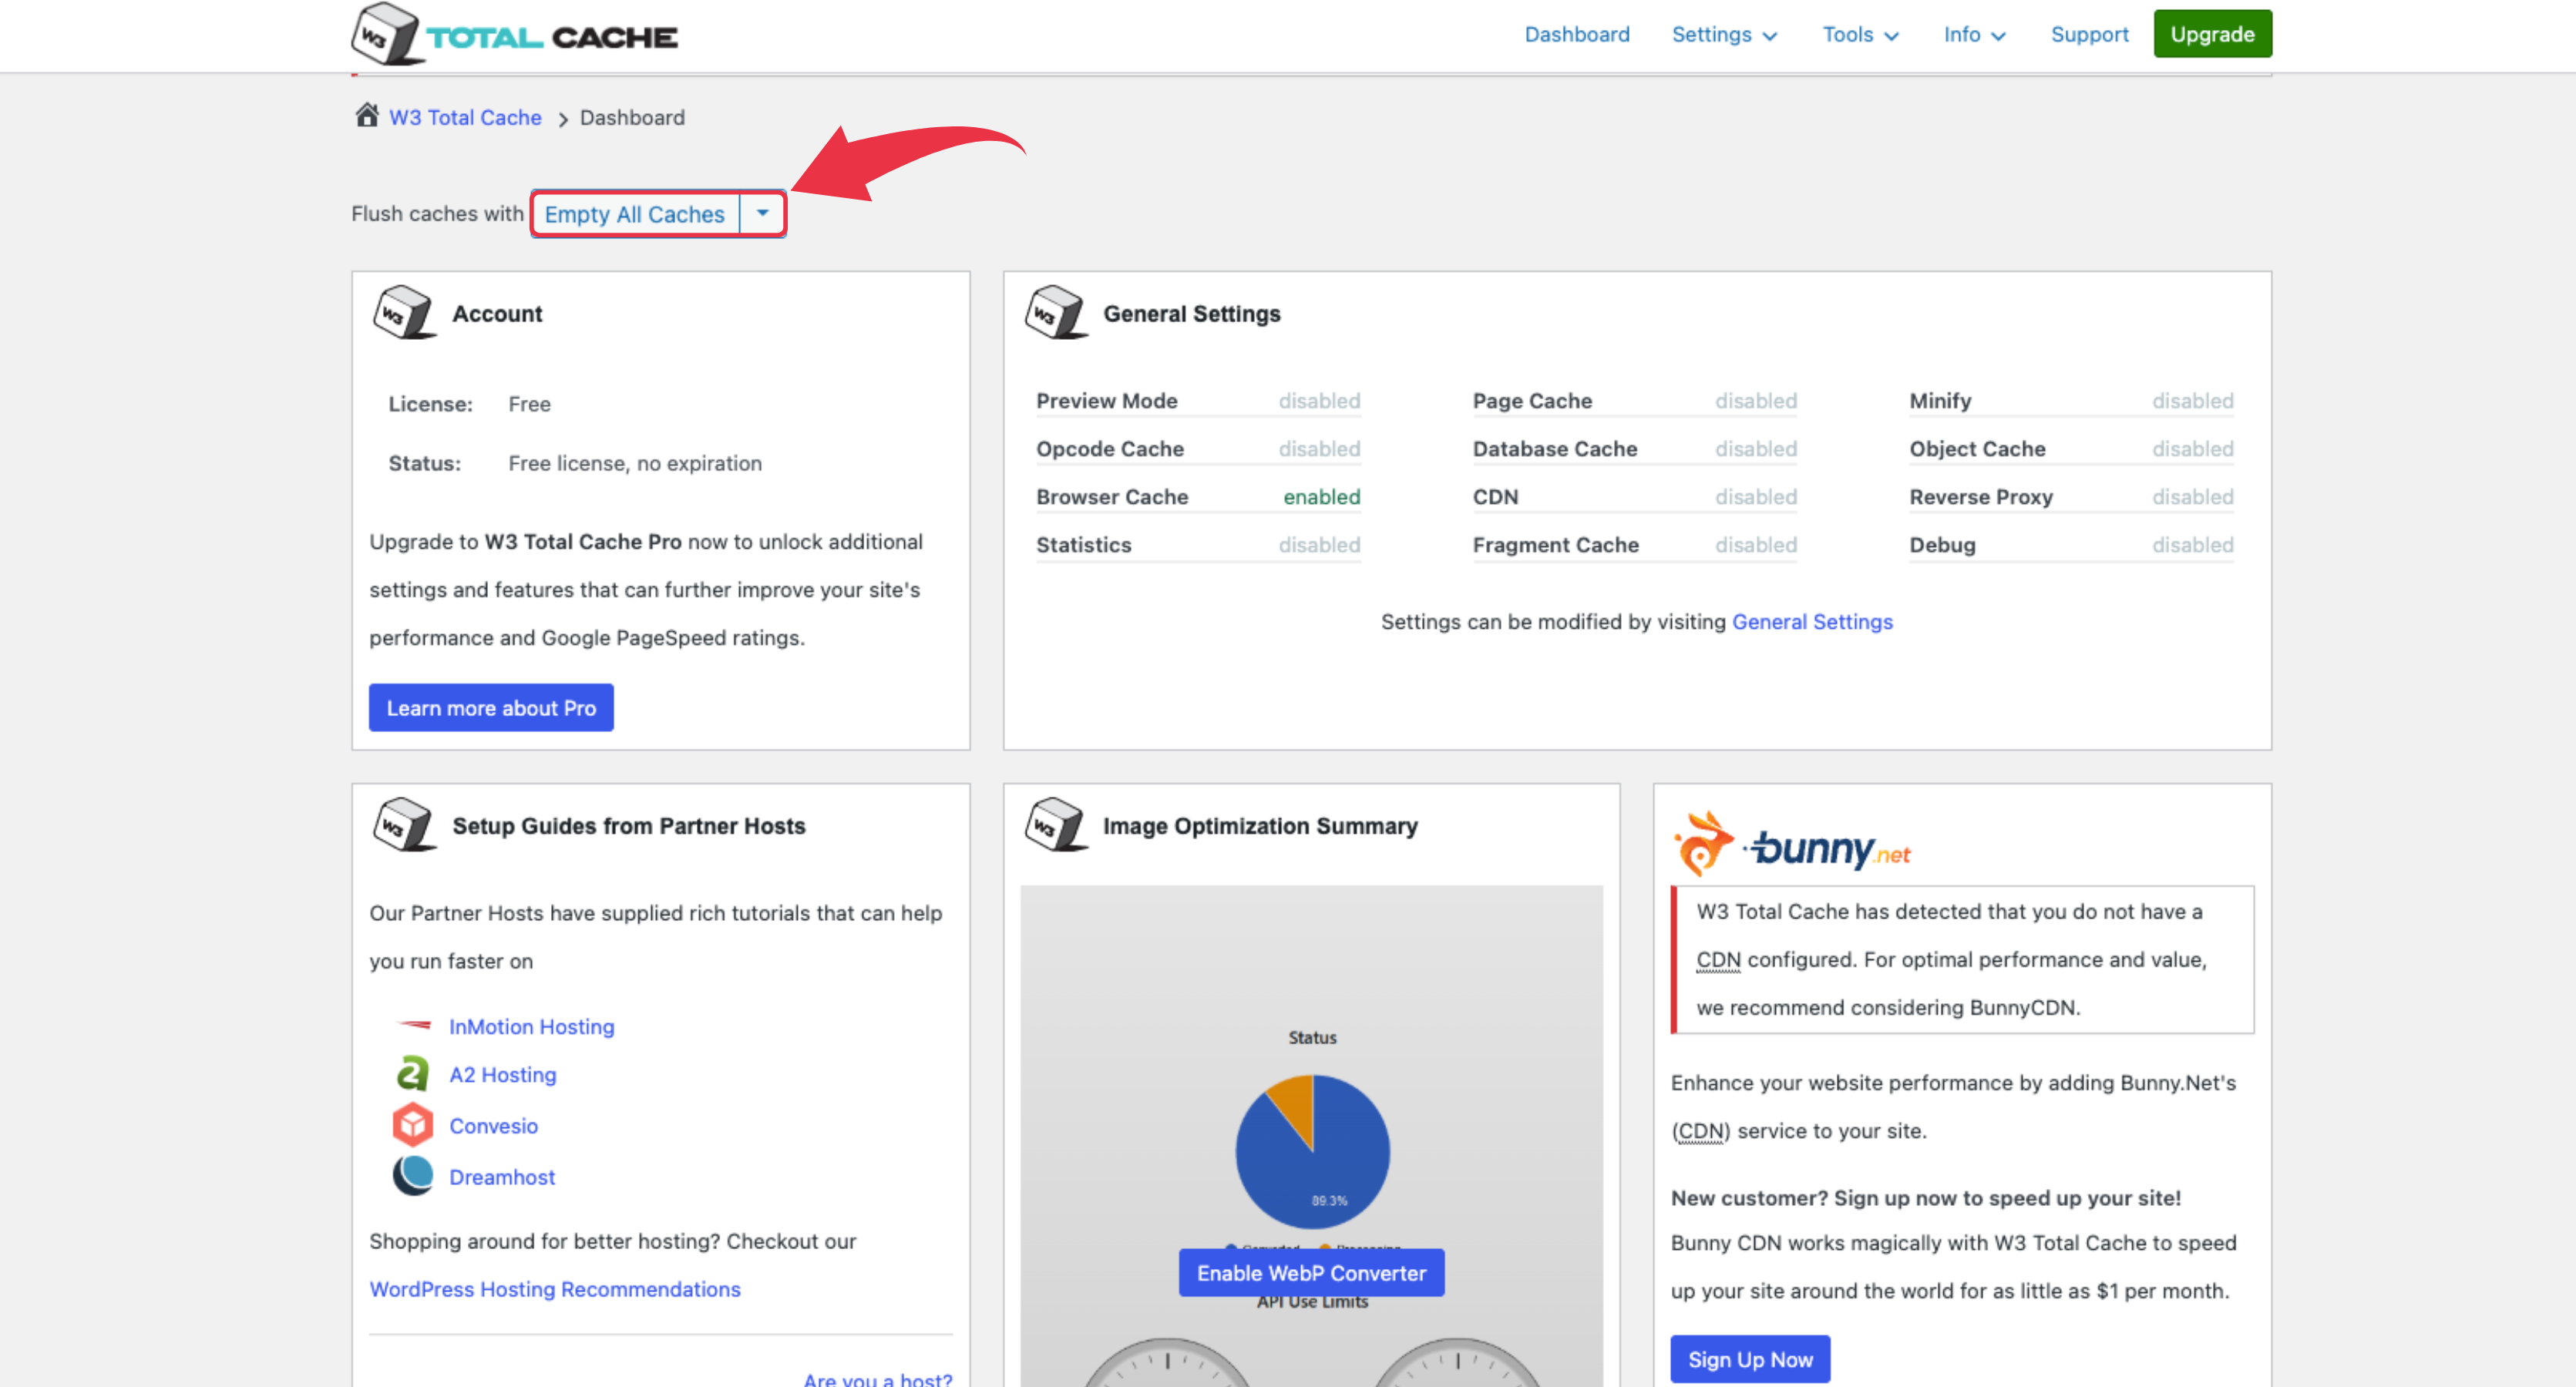
- Finally, you can click “Empty all caches” to clear the cache across all caching types.
This plugin also provides the individual controls for page cache, plugin cache, and CDN cache, giving you precise control over what to clear.
How to Clear Server Cache
Server cache is different from clearing other caches because this operates at your hosting level; it stores your data before it is transferred to your WordPress website. Server-side caching follows a different approach, and it also depends on your hosting provider.
Clearing Cache Through Your Hosting Account Dashboard
If you are using the managed WordPress hosts, it provides the built-in cache management tools. You can access this by using the hosting account dashboard.
- Firstly, log in to your web host control panel.
- Now look for caching or performance sections.
There are widely popular hosting providers like SiteGround, Bluehost, and WP Engine that offer their users the dedicated cache-clearing buttons. If you are using these tools, you can manually clear your server-level caching. When you clear this cache, it decreases the server load and makes the plugin management simpler and easier.
Using FTP Client to Delete Cache Files
If you are an advanced user, FTP Client enables direct access to your cache folders. You can easily connect your server using FTP tools like FileZilla. After this you should navigate to /wp-content/cache/.
From here, you can delete the content of the respective folder to clear the cache manually and remove these cached files.
Note: Always remember not to delete the cache folder itself. You should only delete the content of the cache folder.
You can use this method in a situation where you can’t access your WordPress dashboard because of any plugin conflicts.
As soon as you delete your cache files using FTP, the website caching system will automatically regenerate the necessary cache files.
Server Level Caching Controls
Hosting provider platforms use different tools like Varnish, Redis, or Memcached for efficient server cache. However, these processes require specific clearing methods:
If you are using the Varnish cache, there is the presence of the purge cache button in your hosting dashboard. Also, the object cache can be cleared using the command-line interface. If you want to utilize a WordPress plugin, you can use Redis Object Cache.
The best approach is to contact your web host support team; they can help to clear the cache at the server level.
How to Clear CDN Cache
CDN, or commonly known as Content Delivery Networks, is an essential feature that helps to improve the website speed and performance. This helps to distribute the cached content to all the servers worldwide.
This spread of the cached content across the globe ensures that website viewers from many regions get to have the best experience with fast website load time and promotes reliability.
Popular CDN Providers
It is essential to have efficient cache management, as it helps to improve your website speed and performance. Here are some popular CDN providers that can help you with cache management in your WordPress website:
Cloudflare:
It’s easy to purge the cache in Cloudflare software. Here are simple steps you can follow:
- Firstly, log in to your Cloudflare dashboard.
- Next, navigate to the “Caching” tabs.
- After this, you can click on “Purge Everything.”
When you do this, you will instantly remove all cached files on Cloudflare’s global edge servers. This ensures your website displays the updated content.
StackPath:
StackPath CDN is another popular CDN platform that makesremoving the cached files easier than ever. Just follow these steps:
- Log in to your StackPath dashboard.
- Next, locate the site setting and navigate to the “Purge Cache” option.
- Finally, select the Purge Cache option.
KeyCDN
The next in our list is KeyCDN; this tool provides cache purge options. You can use both the user dashboard and the API to make the action. The feature includes a full cache purge and the ability to target specific cache files. This can effectively improve the load time of your website.
Automating Cache Clearing
It’s a time-consuming process of clearing the cache manually every time; therefore, automation of the cache-clearing process can save your time and also ensure best website speed and improves the overall experience of the users.
How to Set Up Automatic Cache Clearing
There are many WordPress caching plugins that provide automated cache delete scheduling. Among those plugins, you can utilize WP Super Cache plugin.
WP Super Cache
Here are some easy steps to enable automatic cache clearing with WP Super Cache:
- First, log in to your WordPress website.
- Now, from the WordPress Admin dashboard, navigate to Settings » WP Super Cache » Advanced.
- Next, on the Advanced tab, enable the caching options you prefer. Clear all cache files when a post or page is published or updated” option.
- Finally, click “Update Status” to save your changes.
Best Practices for Cache Management
Here are some best practices that every website owner should consider for the best cache management for their WordPress website.
- Cache only when needed: It is important to clear the cache, but you must consider clearing the cache in the well-mannered way.
- Test cache changes on a staging site: Making changes to your website cache is crucial. Therefore, you should remember to clear them in the safe environment (staging site). This prevents the errors in the live site.
- Monitor site speed after changes: As a responsible website owner, you must monitor and check your website speed. You can use site speed monitoring tools. GTmetrix or Google PageSpeed Insights to regularly check your website speed.
- Enable cache preloading: Yes, it is essential to clear the cache, but more than this, cache preloading should be enabled because it helps in rebuilding the cache automatically.
- Don’t cache dynamic pages: Caching dynamic pages can cause serious errors. Therefore, you should prevent the caching of pages that are dynamic.
- Coordinate cache clearing with your team: If you work in a big team, you must coordinate with the team member before you clear the cache. This prevents the confusion and promotes smooth functioning.
What to Do If Clearing the Cache Doesn’t Solve the Issue
If you end up in a situation where even after you click the delete cache button, the old content is still there. Here are some easy solutions for this:
- Firstly, you should clear your cache of different types. These caches are browser cache, plugin cache, server cache, and CDN cache. You never know which type of cache is still saving your outdated files.
- Secondly, you need to temporarily disable caching. You can do this using caching plugins and pause caching. After this recheck, the correct view will be visible on your website.
- Finally, it is important to check the conflicts in the caching layers. There are many managed WordPress hosts that help you to enable server-side caching that can help you override the setting of WordPress Plugins.
Conclusion
In conclusion, it’s important to manage your WordPress cache because it ensures that your WordPress site delivers fresh content to your viewers. If you have a well-configured temporary storage system, it effectively manages the cached data and also stores database queries. This helps to reduce the load on your website server.
When you implement the right cache settings combined with essential WordPress tools like LiteSpeed Cache or Fastest Cache, it will help you to properly optimize your website’s speed and performance within just a few clicks.
We hope that you understand that if you properly learn how to clear your cache, these cache forces will have smoother, faster, and more reliable experience for your website visitors.
Iron Security
Protect your WordPress website from any threat